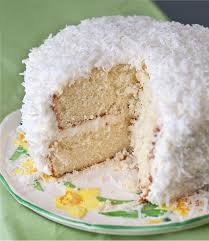
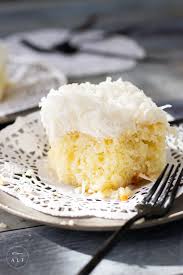
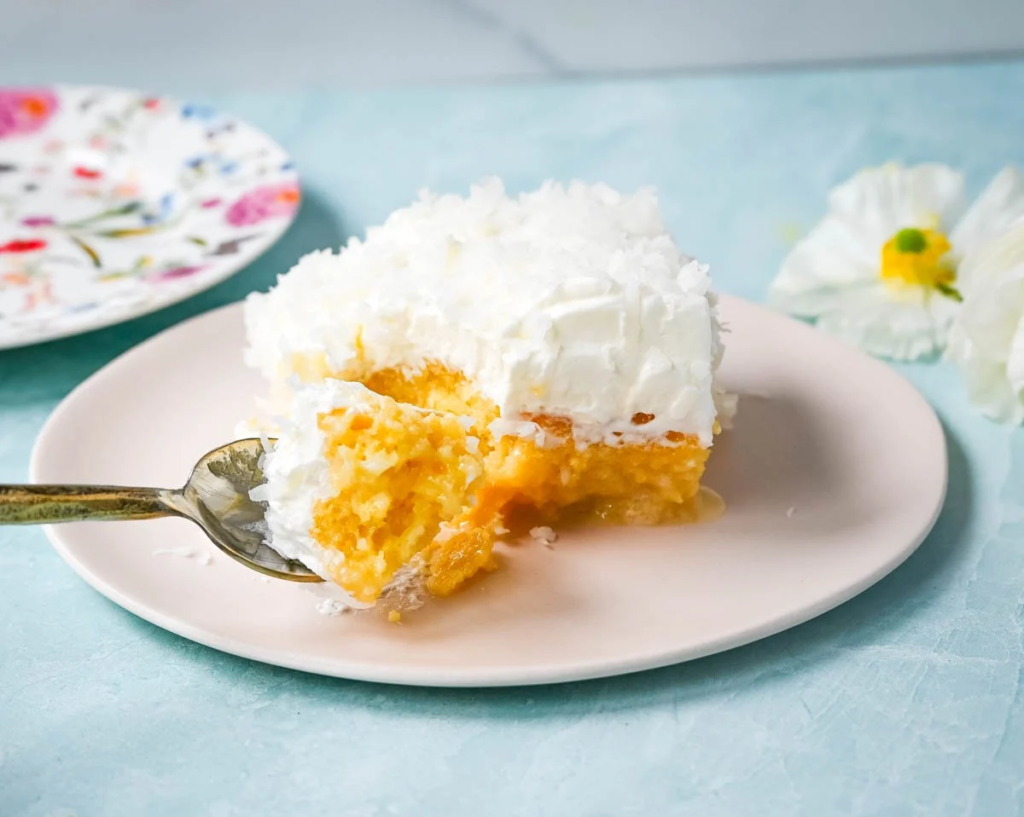
This Coconut Poke Cake is made with a baked cake mix and filled with cream of coconut and sweetened condensed milk and topped with sweet whipped cream and coconut. This Coconut Tres Leches Cake is so easy to make and is perfect for potlucks and parties.
Make the cake by mixing together the cake mix, oil, sour cream, and eggs in a bowl until smooth. Pour into a greased 9 x 13 pan.
Bake at 350 degrees for 28-30 minutes or until a toothpick or cake tester comes out clean.
While the cake is baking, mix together sweetened condensed milk and cream of coconut in a bowl until smooth.
After the cake is baked, poke holes all over the cake with a fork. Pour the milk mixture all over the cake spreading it into the holes. If it isn’t soaking into the cake enough, poke more holes in the cake and spread with a spatula.
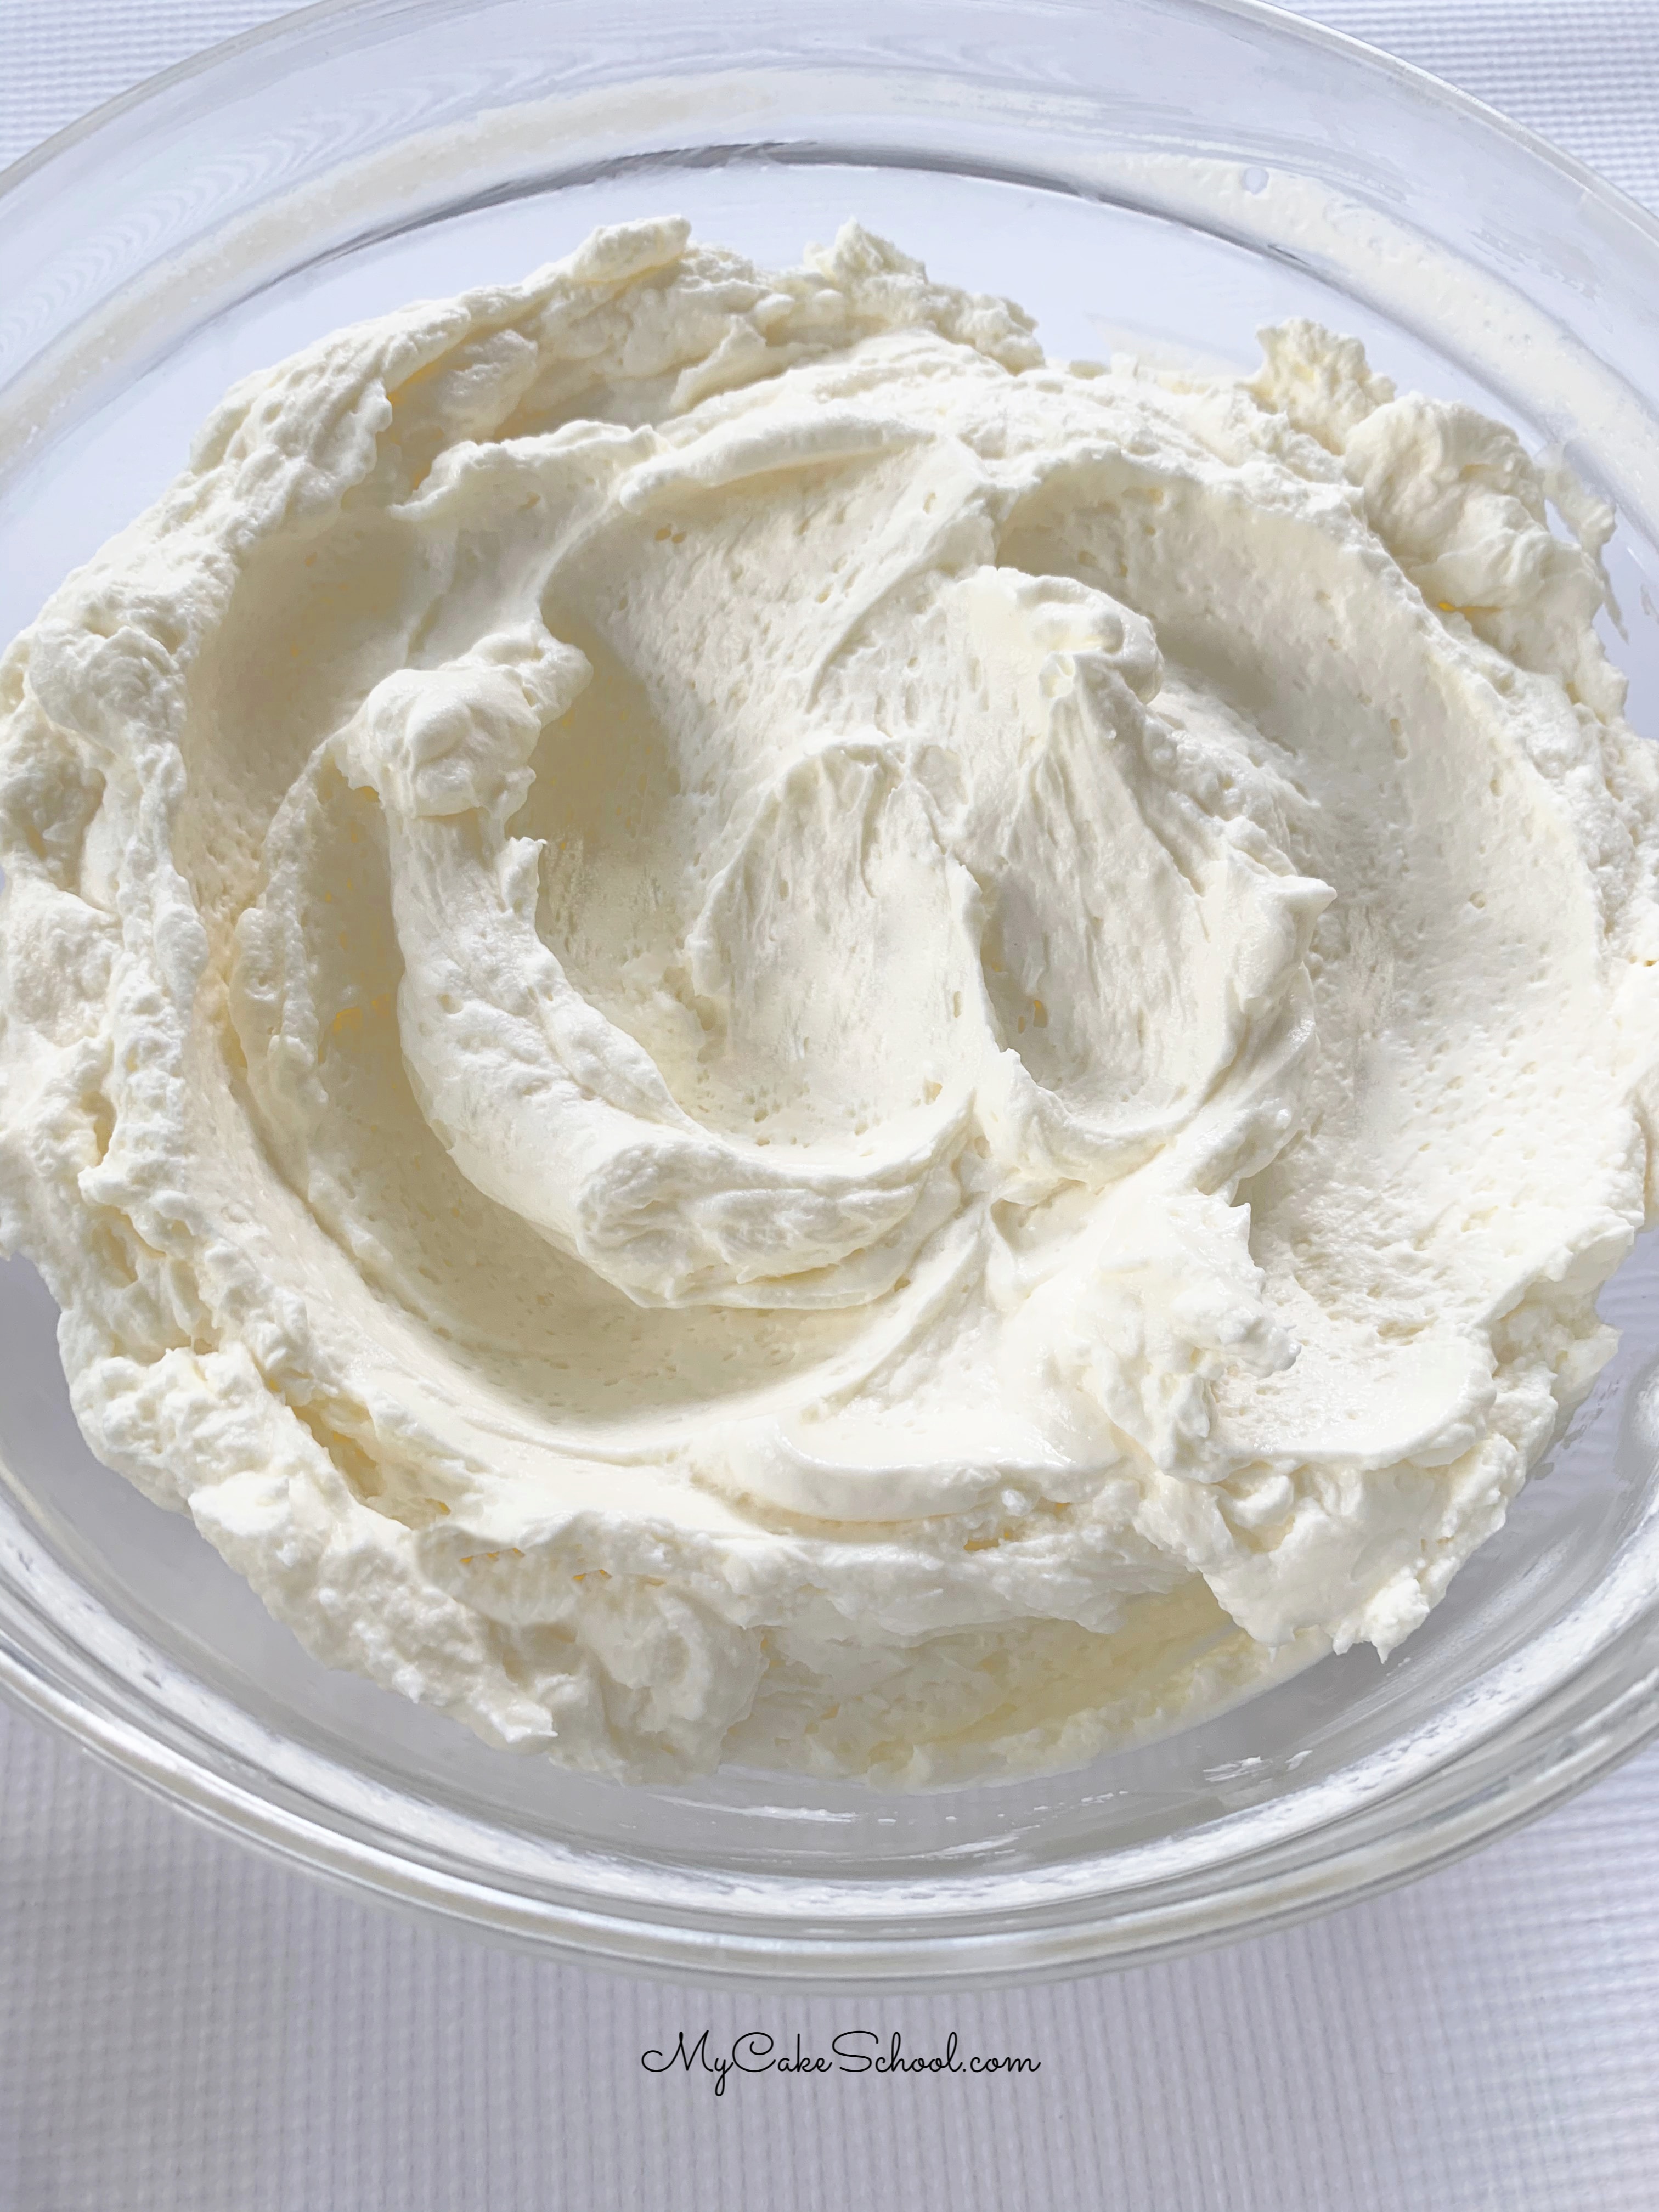
Cover and chill for at least 2-4 hoursor overnight until completely chilled. This cake is meant to be very moist and have a tres leche cake texture. If the milk hasn’t soaked in enough, keep chilled in the refrigerator. Make the sweet whipped cream topping by whipping the heavy cream until stiff peaks form. Fold in powdered sugar.
Spread whipped cream over the cake and sprinkle with sweetened flaked coconut.Cover and keep in the refrigerator until ready to serve. May serve with fresh sliced strawberries.
Notes
What is Cream of Coconut?
It is coconut cream that’s been sweetened and has a thick, syrupy texture. You can usually find it with other non-alcoholic mixers in the drink aisle. You may find brands such as Coco Real, Coco Lopez, and Goya. This should NOT be confused with coconut cream, which is just coconut and water and is unsweetened.
Source: Mom’s Church Cookbook from the 80’s. Changed the recipe from Cool Whip to homemade whipped cream and powdered sugar.
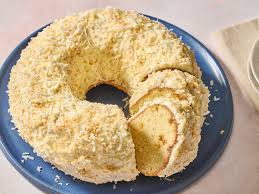
This coconut Bundt cake recipe is a must for all coconut fans! It features a rich sour cream cake with double coconut flavor from both coconut extract and shredded coconut. Then the cream cheese frosting is topped with more shredded coconut for good measure!
Nutrition Facts (per serving)
625
Calories
30g
Fat
85g
Carbs
7g
Protein
Ingredients
1x2x4x
Original recipe (1X) yields 16 servings
Cake
1 cup butter, softened
1 cup sour cream
3 cups white sugar
6 large eggs
1 teaspoon coconut extract
1 teaspoon vanilla extract
3 cups all-purpose flour
½ teaspoon baking powder
2 cups flaked coconut
1 cup white chocolate chips
Frosting
1 (4 ounce) package cream cheese, softened
¼ cup butter, softened
1 teaspoon vanilla extract
2 cups confectioners’ sugar
¾ cup flaked coconut, toasted
Directions
Gather the ingredients. Preheat the oven to 325 degrees F (165 degrees C).ALLRECIPES /JULIA HARTBECK
Grease and flour a 10-inch bundt pan.ALLRECIPES /JULIA HARTBECK
Beat butter and sour cream together in a large bowl with an electric mixer until well combined. Add sugar and beat until light. Add in eggs, 1 at a time, beating well after each addition. Stir in coconut extract and vanilla extract.ALLRECIPES /JULIA HARTBECK
Mix in flour and baking powder, then fold in coconut flakes and white chocolate chips. Pour batter into the prepared panALLRECIPES / JULIA HARTBECK
Bake in the preheated oven until a toothpick inserted into the center comes out clean, about 1 hour 30 minutes. Let stand for about 10 minutes, then run a knife along the edges and invert the pan onto a cooling rack. Allow to cool completely.ALLRECIPES / JULIA HARTBECK
Beat together cream cheese, butter, and vanilla extract in a large bowl with an electric mixer until creamy. Gradually add confectioners’ sugar until frosting is smooth.ALLRECIPES / JULIA HARTBECK
Frost the cake and top with toasted coconut flakes.
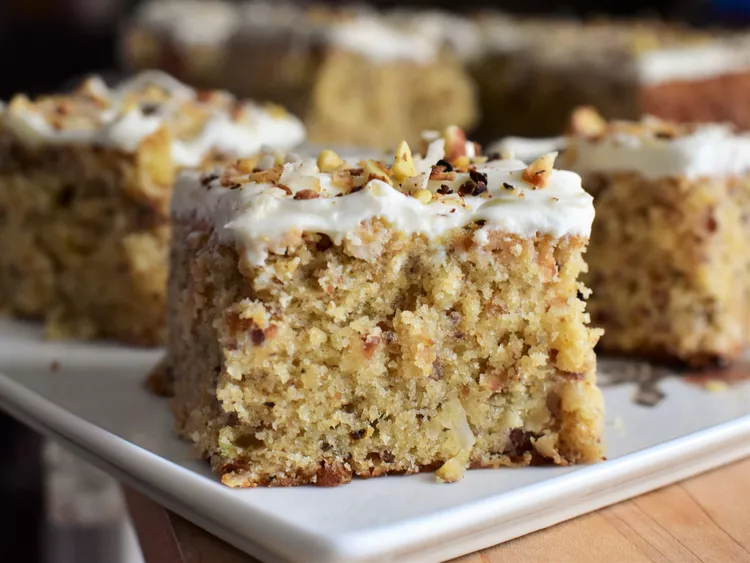
Browned butter, toasted almonds, and toasted coconut give this moist, tender cake a major flavor boost. Topped with a whipped white chocolate ganache, it’s a perfect anytime dessert. There are quite a few required steps in making this—but it’s well worth the extra effort.
Nutrition Facts (per serving)
291
Calories
18g
Fat
29g
Carbs
4g
Protein
Ingredients
1x2x4x
Original recipe (1X) yields 16 servings
White Chocolate Ganache:
½ cup white chocolate chips
½ cup heavy cream
Cake:
1 cup sweetened flaked coconut
¾ cup finely chopped almonds
¾ cup unsalted butter
1 ½ cups all-purpose flour
1 teaspoon baking powder
½ teaspoon salt
½ teaspoon ground nutmeg
¾ cup white sugar
¼ cup firmly packed brown sugar
2 large eggs, at room temperature
1 teaspoon almond extract
1 teaspoon vanilla extract
1 ¼ cups buttermilk, at room temperature
Directions
Place white chocolate chips and heavy cream into a microwave-safe bowl. Microwave at 50% power until melted, about 1 minute, stirring every 30 seconds. Stir to thoroughly combine. Cool at room temperature for 10 minutes; cover and place into the refrigerator to cool completely, at least 1 hour.
Add coconut flakes and chopped almonds to a large skillet; cook over medium-low heat, stirring constantly, until fragrant and lightly browned, about 5 minutes. Immediately pour into a bowl and allow to cool completely.
Heat butter in a small light-colored saucepan over medium-low heat, stirring frequently, until butter smells nutty and brown bits begin to form in the bottom of the pan, about 5 minutes. Pour browned butter into a large mixing bowl; allow to cool for 15 minutes.
Preheat the oven to 350 degrees F (175 degrees C). Line a 9-inch square baking pan with enough parchment paper to leave overhang on all sides.
Whisk together flour, baking powder, salt and nutmeg in a bowl; set aside.
Add white and brown sugars to the bowl with cooled browned butter. Cream together until mixture is light and fluffy, 2 to 3 minutes. Add in eggs 1 at a time, mixing well after each addition; beat an additional 2 minutes until mixture has slightly lightened in color. Mix in almond and vanilla extracts. Pour in half of flour mixture and mix until just combined. Pour in buttermilk and mix until just combined. Add in remaining flour mixture and mix until just combined.
Measure out 2 tablespoons of toasted coconut mixture; set aside for topping. Fold remaining coconut mixture into cake batter. Pour batter into prepared pan and smooth into an even layer. Tap pan on the counter a few times to remove air bubbles.
Bake in the preheated oven until the top of the cake springs back lightly when touched and a toothpick inserted near the center comes out clean, 45 to 50 minutes. Remove cake from oven; place on a wire rack to cool completely, about 30 minutes.
Remove white chocolate ganache from the refrigerator. Whip on medium-high speed until it holds stiff peaks, about 2 minutes. Spread whipped chocolate ganache evenly onto completely cooled cake. Sprinkle reserved coconut mixture on top of cake.
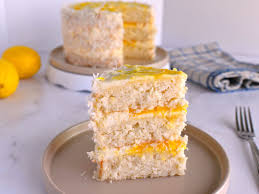
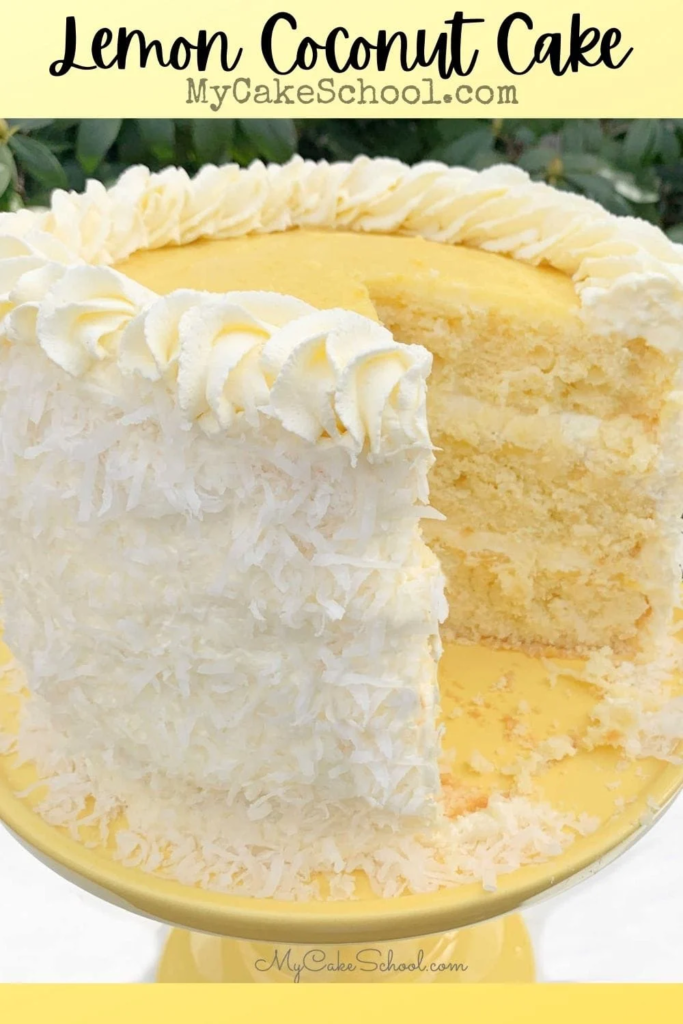
Today’s lemon cake is a moist lemon buttermilk cake with coconut folded into it. It is light, fluffy, and wonderfully moist!
We are using the conventional mixing method (as opposed to reverse creaming) which results in a nice, soft cake- and it all comes together very easily.
**Find the full, printable recipe further down– but here is a quick rundown of the steps!
Preheat: Preheat oven (to 350 degrees f). In a medium bowl, whisk the flour, baking powder, baking soda and salt for 30 seconds to help distribute the ingredients and aerate.
Buttermilk Mixture: In another bowl, add the buttermilk, oil, lemon extract and lemon juice. Using buttermilk in the recipe is helpful as the acidity helps to soften the gluten (resulting in a softer cake)!
Butter and Sugar: In the bowl of your mixer, add the butter and mix at medium speed until smooth. Gradually add the sugar and continue to mix on medium speed for 3 to 5 minutes until fluffy and light.
Eggs: Add the room temperature eggs one at a time (We like to wait until the yellow of the yolk disappears almost completely before adding the next)
Dry and Wet Ingredients: With the mixer on low speed, alternately add the flour mixture and buttermilk mixture, beginning and ending with the dry ingredients (I did 3 additions of dry ingredients and 2 of liquid).
Shredded Coconut: Finally, fold in the shredded coconut and divide the batter between the three prepared 8 inch cake pans.
Bake at 350 degrees for 22-24 minutes until the center of the cake springs back when lightly touched or until a toothpick comes out clean (or with just a few crumbs attached)
Lemon Curd and Coconut Whipped Cream Cheese Filling
Our moist lemon and coconut cake layers deserve to be filled with an equally luscious filling. That’s where our lemon curd and coconut whipped cream cheese filling come in!
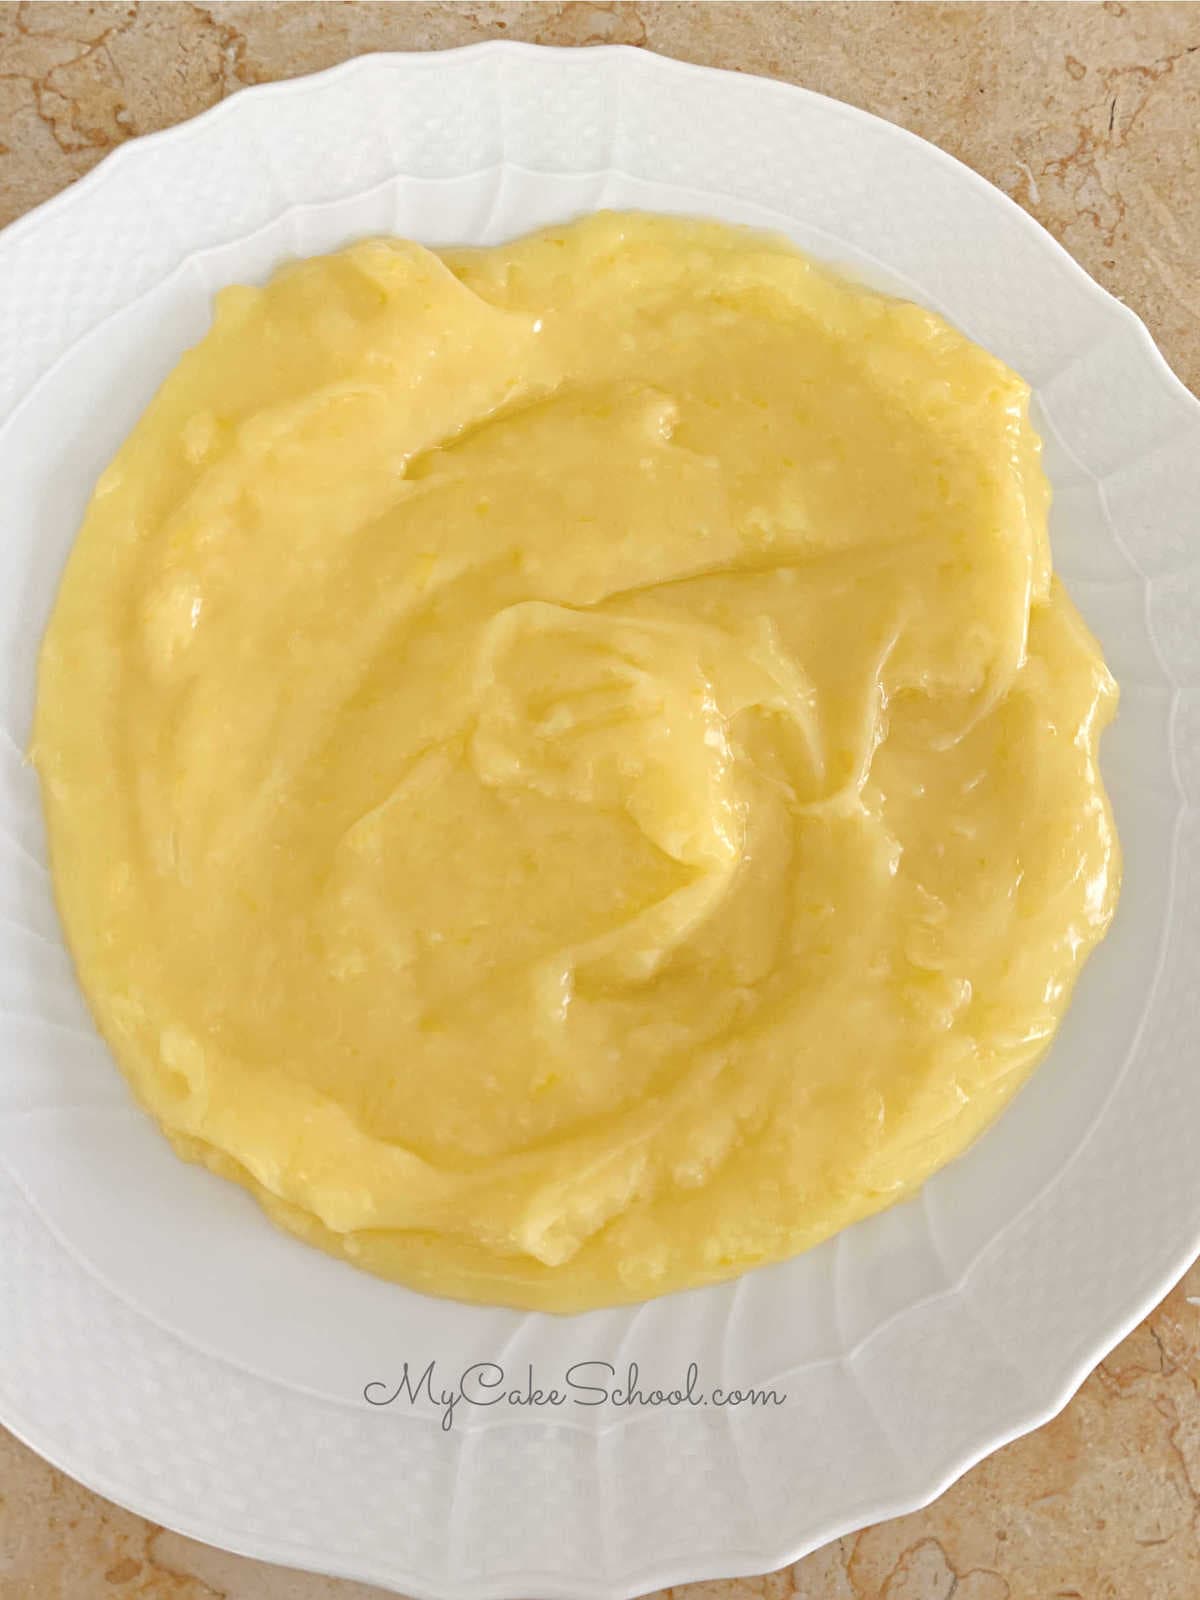
Lemon Curd
If you’ve never tried our Lemon Curd filling, you are going to be amazed not only by the flavor (thanks to the fresh lemon juice and lemon zest) but also by how quickly it comes together when heated in a saucepan.
Making lemon curd is just a matter of combining white sugar, corn starch, and water in a saucepan over medium heat and then combining with the butter, egg yolks, and lemon.
The result is so silky smooth and wonderful! This tangy lemon curd is not overly tart- it has just the right amount of lemon to give your cakes and cupcakes a fantastic boost of lemon flavor.
The lemon curd will thicken as it cools.
After spreading our cake layer with lemon curd, we followed with coconut cream cheese filling so that we could keep a balance of flavors in the filling.
Whipped Coconut Cream Cheese Filling
We love cream cheese frosting recipes and have made many variations over the years. However, sometimes we want a lighter consistency to our frostings and fillings.
This is exactly what we wanted for today’s cake, and so we used our go-to whipped cream cheese frosting recipe and added coconut extract. We only used a teaspoon of coconut extract but you can easily adjust it to your liking!
Whipped cream cheese frosting is just a matter of whipping up heavy cream in a cold bowl (with a cold whisk attachment or beaters) on high speed until stiff peaks form.
Then, mix the cream cheese, sugar, and flavorings and then gently combine with the whipped cream. The result is just as you would imagine– the whipped consistency is still there, but is slightly more stabilized by the cream cheese and sugar mixture.
* While I find it difficult to frost cakes with a perfectly smooth finish when working with whipped frostings like this – it pipes great and is fine to use for textured frostings (as we tried with out Butter Pecan Cake).
The decorating is especially easy when flaked coconut is involved! I simply frosted with coconut whipped cream cheese frosting and pressed the coconut into it.
Assembling the Coconut Lemon Cake
Place the first cool (or room temperature) cake layer on your cake base or cake stand.
Spread with a fairly thin layer of (cooled) lemon curd. The lemon curd at this point will have thickened to a very spreadable consistency. I like to spread softer fillings to about ¼ to ½ inch from the edge fo the cake to prevent it from escaping.
Is it necessary to pipe a dam?
If I were using a buttercream or cream cheese (not whipped) as my frosting, I would pipe a dam of buttercream about ¼ inch from the edge of the cake layer before adding a soft filling.
However, since our soft whipped coconut cream cheese filling is going to be used as our frosting as well, and it is no thicker than our lemon curd, we are skipping the dam today. Instead, just do not take the fillings all the way to the edge of the cake. This worked well for us!
Adding the Coconut Whipped Cream Cheese Filling
Spread a layer of coconut whipped cream cheese filling on top of the lemon curd. It will spread very easily. However, remember not to take it all the way to the edge of the cake. I sprinkled a little shredded coconut on top of the Whipped Coconut Cream Cheese layer of filling but this is optional ;0)
Stack the second layer and repeat the steps, spreading with a thin layer of lemon curd followed by the coconut whipped cream cheese frosting (and extra coconut if you like).
Finish with the final lemon coconut cake layer. At this point, I spread the top of the cake with lemon curd, and filled in the gaps in between the cake layers with coconut whipped cream cheese frosting (applied from a disposable piping bag with the tip snipped away).
This gives us a little extra insurance that everything will stay contained.
You can see the “fill in the gaps” step in the cake photo below- you can also see that I may have gotten a little carried away with the amount of lemon and coconut filling that I used! This meant larger gaps to fill with frosting ;0)
Next, frost the cake as usual around the sides with the coconut whipped cream cheese frosting, and press coconut flakes into it. I finished off the cake with a piped border around the top edge.
Unrefined coconut oil: This can be found in a glass jar in most grocery stores. Refined is also frequently available, but unrefined has a more pronounced coconut flavor and is worth seeking out. Be sure to melt the oil before using it (you want it in its liquid form when assembling the cake), as it is often solid when purchased.
Coconut extract: Contributes to the flavor of the cake and frosting in a natural way (it does not give off a floral or fake taste). The entire recipe only requires 3/4 teaspoon and you can always pull back a little if you like (or omit it altogether). If you cannot find coconut extract in your local grocery store, it is easily purchased online.
Full-fat canned coconut milk: A wonderful way to get more flavor and moisture into your cake. It is relatively easy to find in most grocery stores and, like the extract, is used in both the cake and frosting. Canned coconut milk can be lumpy, so be sure to vigorously shake the can before opening it.
Cake flour: Helps lighten the crumb of the cake layers, which are a bit craggy in texture due to the addition of the shredded sweetened coconut.
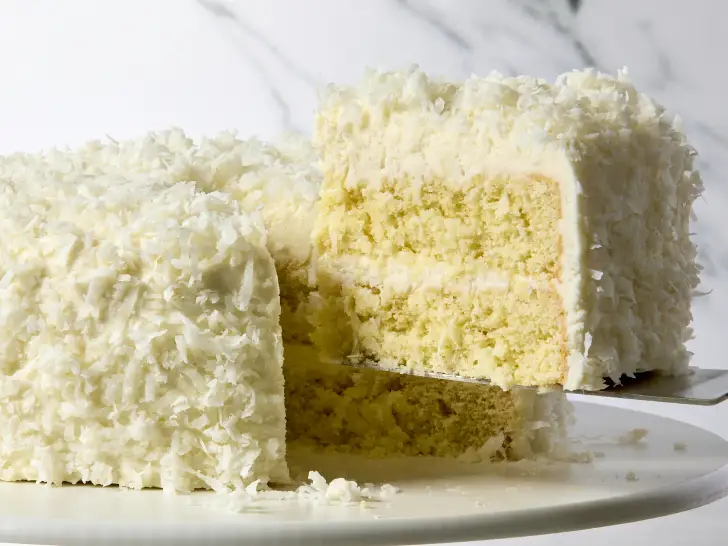
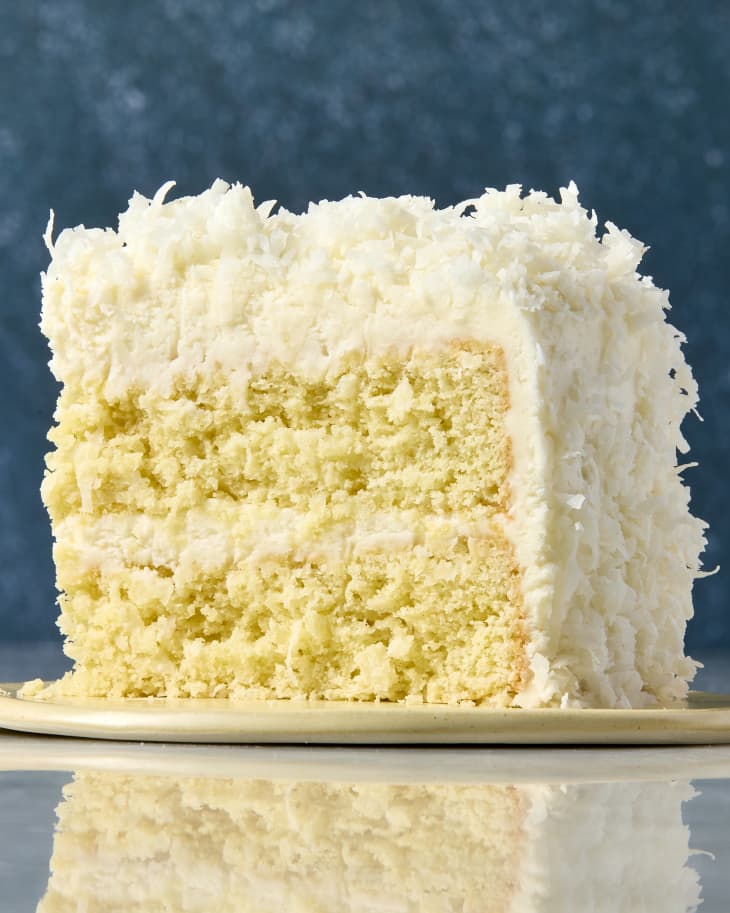
Shredded coconut: This is folded into the cake batter and is also pressed onto the frosting, adding moisture, flavor, and good looks.
Cream cheese: An essential ingredient, as it contributes to a frosting that is the perfect tangy foil to the sweet, shredded coconut-filled cake layers.
How to Make Coconut Cake
Start by making the cake batter. Adding the extracts when you add the oil helps pop their flavor, as fat carries flavor. Whisk in the whole eggs (no need to separate them) and the milk, sprinkle the leavening and salt over the batter, and whisk again. Combining the leavening and salt with the wet ingredients, rather than with the dry, not only ensures they will be properly distributed in the batter, but also means you do not need to use an extra bowl to whisk your dry ingredients together.
Fold in the cake flour and shredded coconut. Adding these two ingredients at the same time precludes overworking the batter.
Bake the cake layers for 20 to 25 minutes. The layers bake up fast; while they do, save time later by making the frosting.
Make the frosting. Beat room-temperature butter and cream cheese together until creamy. You do not want to overbeat the cream cheese or it will lose structure, so be sure to keep an eye on it. Add the powdered sugar, coconut milk, coconut extract, vanilla extract, and kosher salt, then beat just until combined.
Frost the cooled cake layers. To cool the layers quickly, once removed from the pans, place the layers in the freezer for 15 minutes or so, until room temperature. To cover the sides of the cake in coconut, take one small handful at a time, and gently press it onto the side of the cake, making your way around the whole cake, and going back with additional handfuls to fill in any spots you missed.
Helpful Swaps
Vegetable oil or melted butter may be substituted for the coconut oil, but the cake’s coconut flavor will be compromised.
Whole cow’s milk may be substituted for the coconut milk.
Unsweetened coconut flakes or unsweetened dessicated (finely ground) coconut may be substituted for the sweetened shredded coconut in and on the cake.
The cake is best the day it is made, but leftovers will last lightly wrapped in plastic wrap in the refrigerator for up to 3 days. Let come to room temperature before serving.
The cake layers can be baked ahead, cooled, wrapped in plastic wrap, and left on the counter overnight. The layers can also be frozen for up to a month. No need to defrost the layers before assembling the cake — just bring to room temperature before serving.
To freeze, place the frosted cake in the freezer until frozen solid. Wrap the cake tightly in plastic wrap and freeze for up to 1 month. Thaw uncovered in the refrigerator overnight and then let come to room temperature before serving.
:max_bytes(150000):strip_icc():format(webp)/ALR-8533944-coconut-bundt-cake-VAT-4x3-29983960ff094f248fc03fde9a4414af.jpg)
:max_bytes(150000):strip_icc():format(webp)/ALR-8533944-coconut-bundt-cake-VAT-step-01-16ecaac116424ee1b3ee64baf88f77a7.jpg) ALLRECIPES /JULIA HARTBECK
ALLRECIPES /JULIA HARTBECK:max_bytes(150000):strip_icc():format(webp)/ALR-8533944-coconut-bundt-cake-VAT-step-02-01e1f8ae81d34d96839c1234f4de759c.jpg) ALLRECIPES /JULIA HARTBECK
ALLRECIPES /JULIA HARTBECK:max_bytes(150000):strip_icc():format(webp)/ALR-8533944-coconut-bundt-cake-VAT-step-03-d088d84f952342149d053c4144d1c63c.jpg) ALLRECIPES /JULIA HARTBECK
ALLRECIPES /JULIA HARTBECK:max_bytes(150000):strip_icc():format(webp)/ALR-8533944-coconut-bundt-cake-VAT-step-04-15057cb3a25142c79d407c52d86dc8f1.jpg) ALLRECIPES / JULIA HARTBECK
ALLRECIPES / JULIA HARTBECK:max_bytes(150000):strip_icc():format(webp)/ALR-8533944-coconut-bundt-cake-VAT-step-05-871e24a9882e499c946972d1946473f4.jpg) ALLRECIPES / JULIA HARTBECK
ALLRECIPES / JULIA HARTBECK:max_bytes(150000):strip_icc():format(webp)/ALR-8533944-coconut-bundt-cake-VAT-step-06-2cc833bd27bc4ec6a46cde3171604229.jpg) ALLRECIPES / JULIA HARTBECK
ALLRECIPES / JULIA HARTBECK:max_bytes(150000):strip_icc():format(webp)/ALR-8533944-coconut-bundt-cake-VAT-step-07-63c71a16e9e8458caf9d70bb86ed5f50.jpg)